Really love this little top – although it’s not as little as it maybe should be. I’m feeling quite nervous as it’s currently in the washing machine...I ummed and arred about hand washing it initially but decided that since it’s 100% acrylic and machine washable, maybe I should just go for it. I’m hoping this smoothes out some of the stitching as there’s a section on the back of the hood where I made a mistake that is a little loose now, and the grafting along the top of the hood isn’t completely invisible.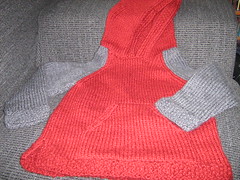
I made a few changes to the pattern, which I’ve mentioned on my Ravelry project page. I need to think about the balance between this blog and my Ravelry pages, I’m never quite sure where to put what!
The main thing I did was use a substitute yarn which gave me a smaller gauge. To avoid writing the pattern totally, I (and my Dad) worked out that stitch-wise, although I was aiming for the 6yr old size, I could follow the stitch count/instructions for the small adult size. The pattern handily included detailed pictures of the individual pieces and their dimensions. This meant that I could knit to the right lengths for the smaller size. I know, it all sounds very risky, but it seems to have worked out – I was nervous when I got to the raglan seams, as I hadn’t really taken those into consideration!
Other things I did include knitting the moss stitch cuffs in the round to avoid the need for a seam, which means they can be worn down, or folded back. The rest of the sleeve was knit flat.
I also did the hood a little differently. The pattern indicated knitting the hood minus the moss stitch ending, then picking up around the edge and adding it last. I didn’t fancy doing that, so I just knit the hood complete with edge. As the top of the hood is grafted to avoid a seam, it meant I had to graft moss stitch! I tried not to think about that bit until I needed to. When I did get up to it, I googled but nothing jumped out. I eventually remembered how to cheat graft!! This involved knitting an extra row or two in a contrasting yarn, then doing the graft with the live yarn, following the lead of the contrasting yarn. I started by doing two rows in contrasting yarn, but I found it a bit confusing, so I pulled out one row and that made it better to see what I was doing. I made the graft, then pulled out the contrasting yarn. All worked out well! I’m sure it’s the only way to go about grafting moss stitch.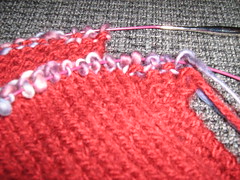
I’m fairly sure the top is going to be a little big for my nephew, but he’ll grow into it...I just hope he doesn’t need to grow into a new shape!!
ETA: It came out of the wash looking the same size (yey/phew) and far more lovely, soft and fluffy. The stitches have evened out a little, but my tention on the graft was obviously a bit tight (still doesn't look too bad though). I really love it. It's so soft I just want to snuggle my face into it!
Sunday, 20 April 2008
Finished item: Santa Cruz Hoodie
Tuesday, 4 December 2007
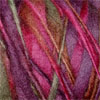
Garter stitch, stripes, kitchener stitch, perseverance, but mainly stupidity
I did it! I finally managed to graft my garter stitch stripes! I tried to do this sooo many times! Each time failing miserably. I have a bruise on my forehead from where I just slapped myself when I realised what was wrong. It was all my own stupid fault! I had the technique right all along!!
Short answer:
I hadn't taken into account the cast on row. I'd basically cast on then knit two rows of black, two of red etc. Essentially, I had created three initial rows of black instead of two. No wonder it wasn't coming out right!! Curses!!
Long answer: (which will hopefully keep my stupidity at bay next time I need to do this)
This is what I had in front of me, two row high black and red garter stitch stripes. I cast on and started off with two rows of black, carried on red, black etc until the desired length and ended with one row of red - the graft making up the final red row (and I thought I was clever for having working that out!).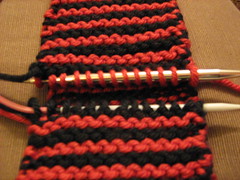
I found instructions for how to graft garter stitch and followed them. I got the right set of red double bumps but an extra set of black - I thought that the black bumps should have been on the wrong side, rather than the right side, so tried again. And again. And again... I lost count of the amount of times I tried.
Browsing through the Ravelry forums in despair, someone mentioned that there was a way of cheating at kitchener stitch! Trusty Google came to the rescue and I found these instructions:
http://pinklemontwist.blogspot.com/2005_12_01_archive.html (scroll down to Dec 22nd 05). Genius!! How to do kitchener without kitchener(ing).
It was through adding my extra contrasting coloured yarn rows that my mistake was detected. Things just weren't looking right, that extra row of black bobbles was still appearing. That was my d'oh moment. I unpicked the 'extra' cast on row and thing looked a LOT better!!
I still went ahead and tried this technique, even though, technically, following my initial kitchener instructions would now work...
This is how I started, two extra rows at each end of the graft in a contrasting colour.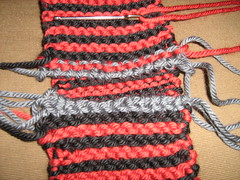
Then just follow the lead of the contrasting yarn for the weave of the graft. For some reason it felt more comfortable to do this from the wrong side, not sure why as it would have been a similar experience from either side...(although probably better to have done it the other way round so that tention of the stitches was visible).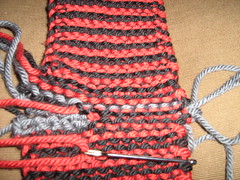
Completely zipped up.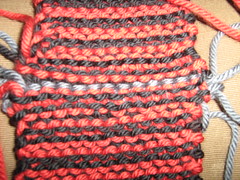
The zip from the right side...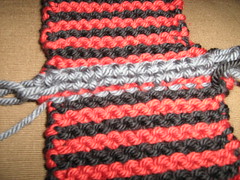
Unzipping the contrasting yarn all went very smoothly...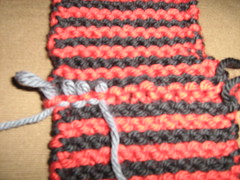
And there I have a finished graft...although those ends look a bit daunting...
How glad am I! And how cool is that technique! There was something very satisfying about unzipping that extra yarn and seeing the perfect graft appear. Although next time (next time!!?) I'll have my wits about me so I don't have any pesky extra rows getting in my way, and have a go at proper kitchener (not the cheat version).
...and relax.
Thursday, 29 November 2007
I hate grafting
Grafting torments me. I can't do it. I hate not being able to do it. I'm pretty much a self taught knitter and have picked up techniques really well through books and the internet - I've actually been really impressed with myself. But grafting is HARD. It reminds me of pool...I'm a logical person, pool is basically geometry, so why do the balls do the complete opposite of what I thought/wanted them to do? Grafting works the same way...it's just a bunch of loops, so why won't they loop the right way?
I need to graft a small section of the hat I'm making for the boys. I've actually finished one. It took me about a week to do the grafting. Lots of swearing and unpicking and trying again. I tried soooo many times and went to bed with a headache on several evenings. I got to the point where I had a join that was pretty bad but, for sanity's sake, would do. I therefore carried on with the pattern for a few rounds. My boyfriend noticed that I'd given up and started looking at it, he convinced me to have another go (it did look quite bad). At one point he even picked it up and had a go himself! During the England match!! He didn't manage but I got a result in the end...it's not EXACTLY right, but only if you look REALLY closely. So this is the first hat - finished (except for the dreaded ends):
But now I have this in front me:
Two failed attempts so far this evening and a headache to boot.
Did I say I hated grafting?