I can't say for sure, but it does seem like my knitting apathy is starting to fade. It was weird that I kept knitting throughout this time, but then, it wasn't just my knitting that I was fed up with, it was everything!
So, I started making a hooded top for my nephews third birthday in April. I'd thought about it for a while, and took a while to find some yarn that I liked. I chose Lion Brand Jiffy as it's chunky, feels nice, is machine washable, and comes in a good range of colours. I'm going for a red top with gray sleeves.
I hoped I'd get near gauge with this yarn but I didn't. Going up a needle size got me closer, but not near enough. Normally, I would see this as a challenge and launch into rewriting the pattern to suit my gauge, but I couldn't bring myself to do it. I was hoping to cheat and make one of the larger sizes, with just a crazy hope of it working out. I asked for help on the Ravelry forum to help me work out what to do since my brain wasn't playing. I was warned off doing anything stupid and I listened. I love Ravelry.
I took this project with me when I went to my parents house over Easter, hoping to make a start. My Dad helped me work out the gauge issue. It's nothing I couldn't have done myself under normal circumstances, but I was glad to have some help. We worked out that stitch-wise, I could actually use one of the larger sizes, we calculated that it would work out (give or take half a cm). Length-wise, the pattern gave a schematic of each of the pieces and their measurements which meant I could use the measurements of the right size. The only bit to worry about is getting the increase and decrease spaced correctly, especially for the sleeves. Everything seems to have worked out for the back, I finished that over the weekend.
I sat down last night and rewrote the sleeve appropriately (well, here's hoping). I was also encouraged to find myself making additional changes to the sleeve to make it better (for me). Now, **that** is progress. The sleeve uses moss stitch for the cuff, then stocking stitch for the rest, and is knit on straight needles. Now, because I'm not sure of length of my nephews arms, and because the pattern shows the cuffs as being folded over, I want to avoid having an ugly seem. I'm not sure if my nephew will need to fold the cuff - so I can't predict which side to put the seem on. I therefore decided I'd do away with having a seem on the cuff at all! I'm going to knit just the cuff in the round, then change to knitting in the flat for the rest. I think I've taken everything into consideration that I need to, will just have to see if it works out.
I've made a start on the first sleeve, just a few rows into the cuff. I stopped to write this. But what I **should** be doing is writing a report that needs to be done by the end of the month and I've only got today and tomorrow free. I've also got some other non-work work to do...not sure how much of anything I'm going to get done. Best make a start though and at least get dressed (I'm sitting writing this in my pyjamas and dressing gown)...then have another coffee...and then see where all my other avoidance tactics take me :o/
Wednesday, 26 March 2008
I think it might be returning
Posted by
von
at
09:42
1 comments
![]()
Labels: apathy, experiment, general, gifts, work in progress
Monday, 21 January 2008
Free Pattern: Camera Sock
This is a finished object that I’ve not blogged about until now. It just made it on to my finished item list of 2007 :o)

- To fit a camera 4 x 5 x 11 cm (give or take a few mm)
- Less than 50g of Debbie Bliss Cashmerino Chunky (didn’t take very much)
- Set of 7mm double pointed needles, or a long 7mm circular needle (I used the latter and the magic loop method of circular knitting – great instructions here: http://www.youtube.com/watch?v=BtBSmxGomPk)
- Spare 7mm needle for cast off.
- 15sts = 10cm
- Sts – stitches
- K – knit
- K2p2 – knit 2 purl 2
- K2tog – knit 2 together
- Cast on 20sts using the thumb method, or other stretchy cast on – great instructions here: http://www.learn2knit.co.uk/knitting/cast-on.php (basically after a bit of negative ease so that the sock stretches around the camera – I measured the circumference of my camera to be 17.5cm, so using 20sts at the set gauge will make it stretch a bit)
- Join round making sure the stitches aren’t twisted and place marker at the beginning of the round
- Work in k2p2 rib until work measures about 17cm (or about 6cm longer than the length of the camera) [20sts]
- Then knit about 6 rounds [20sts]
- Next round: k2tog, k2, k2tog, k4, k2tog, k2, k2tog, k4 [16sts]
- Next round: k2tog, k2tog, k4, k2tog, k2tog, k4 [12sts]
- Next round: k2tog, k4, k2tog, k4 [10sts]
- Next round: cast off using three needle cast off on wrong side (great instructions here: http://www.crazyauntpurl.com/archives/2005/12/one_bassackward.php)
- Weave in ends
- Put camera in sock and enjoy!
[Edited to amend decreases]
Posted by
von
at
00:23
0
comments
![]()
Labels: camera sock, experiment, finished item, free pattern
Tuesday, 4 December 2007
Garter stitch, stripes, kitchener stitch, perseverance, but mainly stupidity
I did it! I finally managed to graft my garter stitch stripes! I tried to do this sooo many times! Each time failing miserably. I have a bruise on my forehead from where I just slapped myself when I realised what was wrong. It was all my own stupid fault! I had the technique right all along!!
Short answer:
I hadn't taken into account the cast on row. I'd basically cast on then knit two rows of black, two of red etc. Essentially, I had created three initial rows of black instead of two. No wonder it wasn't coming out right!! Curses!!
Long answer: (which will hopefully keep my stupidity at bay next time I need to do this)
This is what I had in front of me, two row high black and red garter stitch stripes. I cast on and started off with two rows of black, carried on red, black etc until the desired length and ended with one row of red - the graft making up the final red row (and I thought I was clever for having working that out!).
I found instructions for how to graft garter stitch and followed them. I got the right set of red double bumps but an extra set of black - I thought that the black bumps should have been on the wrong side, rather than the right side, so tried again. And again. And again... I lost count of the amount of times I tried.
Browsing through the Ravelry forums in despair, someone mentioned that there was a way of cheating at kitchener stitch! Trusty Google came to the rescue and I found these instructions:
http://pinklemontwist.blogspot.com/2005_12_01_archive.html (scroll down to Dec 22nd 05). Genius!! How to do kitchener without kitchener(ing).
It was through adding my extra contrasting coloured yarn rows that my mistake was detected. Things just weren't looking right, that extra row of black bobbles was still appearing. That was my d'oh moment. I unpicked the 'extra' cast on row and thing looked a LOT better!!
I still went ahead and tried this technique, even though, technically, following my initial kitchener instructions would now work...
This is how I started, two extra rows at each end of the graft in a contrasting colour.
Then just follow the lead of the contrasting yarn for the weave of the graft. For some reason it felt more comfortable to do this from the wrong side, not sure why as it would have been a similar experience from either side...(although probably better to have done it the other way round so that tention of the stitches was visible).
Completely zipped up.
The zip from the right side...
Unzipping the contrasting yarn all went very smoothly...
And there I have a finished graft...although those ends look a bit daunting...
How glad am I! And how cool is that technique! There was something very satisfying about unzipping that extra yarn and seeing the perfect graft appear. Although next time (next time!!?) I'll have my wits about me so I don't have any pesky extra rows getting in my way, and have a go at proper kitchener (not the cheat version).
...and relax.
Posted by
von
at
07:55
1 comments
![]()
Labels: experiment, garter stitch, grafting, how to, stripes, work in progress
Monday, 24 September 2007
Experiment
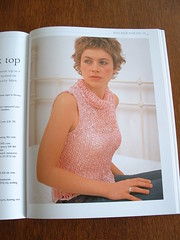
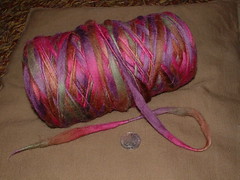
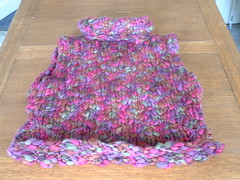
Being a new knitter, keen to explore, with the newly acquired understanding of gauge…I decided to do an experiment. I took a pattern that I quite liked, and used a *completely* different yarn that I was desperate to use for something. After knitting a few sample squares to work out the right size needles to use…this is what happened:
Although I do quite like it, it’s a tad bulky to wear. I keep picking it up and trying it on, then putting it down again to think about what I’m going to do about it some more. I’m chuffed that I managed to make it…but maybe I should unravel and make something else :o(
Posted by
von
at
14:52
0
comments
![]()
Labels: experiment, finished item


